Step 4 - Accepting the payment
In this manual, we will guide you through the process of how PayTabs SDK accepts the payment you initiated or prepared in the previous step Step 3 - Initiating the payment. We will start from the moment PayTabs receives the payment request from your side and continue until it sends you the response, which you will handle in the next step. Follow along as we break down each stage of this process:
1- Validate the configuration details
The initial step in the integration process involves validating the configuration options defined for the selected payment method. This ensures that all provided values are correctly formatted and supported by the PayTabs Mobile SDK.
We highly recommend you check the configuration properties specifications manual by clicking here.
During this phase, PayTabs also performs validation on the parameter values to confirm their correctness and compliance with expected formats and constraints. For example:
The SDK validation: In this step, the SDK performs validation on the integration configuration before proceeding with the payment process. This validation may occur either:
- Prior to launching the payment screen, or
- Before sending the payment request to the PayTabs server, after clicking the
PAY NOWbutton.
The purpose of this validation is to ensure that all configuration values are correctly defined and conform to the expected formats and constraints. For example:
Not set the cart ID: In such case, you will receive the error:
onError: PaymentSdkError(
              code=-1,
              msg="Cart ID is empty!",
              trace=null)
You Should KnowThe trace code in this case is
null, indicate that the error probable come from the SDK.You have the ability to override the SDK errors string text messages from the Theme (Overriding) - strings.
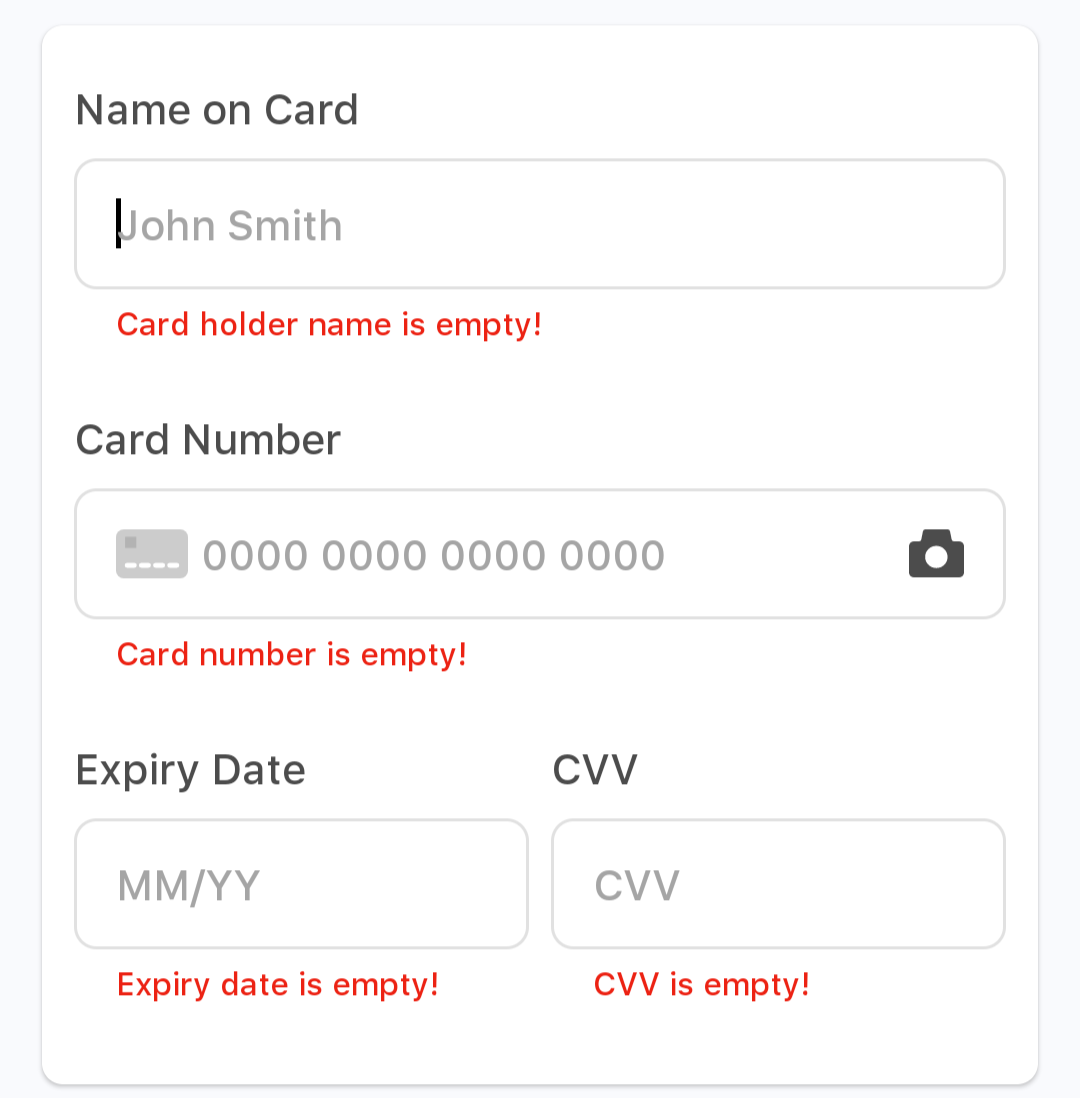
Bank card form validation: So for example, if you set a none valid card number or empty input you will face an validation error message.
PayTabs server side validation: This will return from PayTabs server side, if invalid data provided, For example:
Set invalid currency code: In such case, you will receive the error:
onError: PaymentSdkError(
              code=206,
              msg="Invalid currency code",
              trace="PMNT0000.68F88000.00004000")
You Should KnowThe trace code is provided, and you can find an error log with more details in your dashboard under the inside Developers - API Debug Logs. To know more, check our What is the API Debug Logs? tutorial article.
You alos can check the error code for more information about it. To know more, check our What is: Response_code vs the Response_status? solution article.
2- Checking Request Applicability
The next step will be to analyze the request and to check if PayTabs can proceed with this request's requirements or not regarding the merchant profile, for example:
- Using valid keys (Server Key and Client key) and profile ID to authenticate your integration.
- You are using currency that configured in your profile.
- Pay with recurring, which is not enabled for the merchant profile.
- Pay with Alternative Payment Methods (APMs) that not configured in your profile.
Those are considered Non-valid requests as well, which means results would be returned within the response, and the detailed reason can be found on PayTabs Dashboard under our What is the API Debug Logs? tutorial article.
3- Performing the Transaction.
The payment come across this step Only by call the payment method and initiate the Payment Screen after passing the previous two steps
Our SDKs implement a mechanism known as "Own Form", which enables payment processing to occur directly within your mobile application. However, if you are not a PCI-certified merchant, the handling of sensitive credit card information is managed entirely within our SDK. This ensures that:
- You do not have access to the customer's credit card details.
- All card data is securely processed internally, without any exposure or interference from your application.
This approach maintains compliance with PCI standards while providing a seamless in-app payment experience.
Only APMs (Alternative Payment Methods) such Knet, Valu, etc. Will be displayed in WebView within our SDK using our Hosted Payment Page mechanism to be managed on our side instead.
4- the payment process
Waiting for the customer action; this includes if the customer opens the payment screen and triggers the back button or enters the wrong card details. Only then would the state be changed.
Next, you have may consider three actions before processing with performing the transaction, according to your business needs:
Expiry Timeout:
The expiry timeout for the card payment screen cannot be configured to less than 60 seconds. Once the merchant clicks the
PAY NOWbutton, the expiry timer will be unaffected. If the expiry period pass before the customer click on thePAY NOWbutton payment session will be end, and the transaction attempt will be automatically cancelled. In such cases, the customer will be redirected back to the previous activity screen.Pre-transaction card approval:
The Pre-transaction card approval is a powerful feature offered by PayTabs that enables merchants to implement custom validation logic based on the Bank Identification Number (BIN) of a customer's payment card. This feature empowers businesses to enforce custom approval logic before a transaction is authorized, based on the characteristics of the customer’s payment card.
Upon initiation of a payment, PayTabs transmits a structured request to the merchant’s designated validation endpoint, containing essential card metadata such as the first and last digits of the card, expiry date, and a unique card hash. The merchant’s system is expected to respond within a strict 2-second window, indicating whether the transaction should proceed or be declined. This process ensures that payment decisions are aligned with the merchant’s internal business rules, risk policies, and promotional strategies.
Here are some scenarios to help you understand when to use the card approval feature:
Controlled Discount Eligibility: Merchants can prevent customers from repeatedly availing promotional discounts using the same card by validating the card BIN or hash. This ensures fair usage of offers and protects promotional budgets.
Mitigation of Price Speculation: For businesses operating in sectors with price-sensitive products—such as gold or other commodities—this feature mitigates speculative behavior by preventing customers from securing outdated prices at checkout or the payment page. It ensures that transactions reflect real-time market values, thereby preserving pricing integrity.
Dynamic Pricing Control: For businesses with frequently changing prices (e.g., travel, e-commerce, or commodities), this feature helps prevent speculative behavior. Customers cannot lock in a discounted price using a card that is not eligible or by exploiting timing gaps.
Personalized Customer Experience: Businesses can offer tailored discounts or benefits based on the card type (e.g., premium, rewards, debit), improving customer satisfaction and loyalty.
For more details about this corresponding configuration property please check the Optional cardApproval property.
PreFlight SDK Mode:
In some cases when you are integrating via our SDKs, the response you receive from our end may be different from the order/cart details stored already on your server side, meaning that the original data that has been sent through the Mobile Application (client-side) has been manipulated/intercepted. This is called the "Man-in-the-middle attack).
For more details please check our solution article How to configure an additional security layer for my mobile application via PayTabs' SDKs? (PreFlight SDK Mode).
5-3DSecure Authentication & Processing
If the payment method requires 3DSecure authentication, the customer will be redirected to the 3DSecure page to complete the authentication process. Once completed, the customer will be redirected back to the hosted payment page.
As per the response from the acquirer, the user will be redirected to the issuer 3DSecure page to fill in the required OTP. This phase The 3DS2 process is managed entirely by the issuer bank side; PayTabs is not included.
So what really happens backstage can be simplified as the issuer bank somehow asks PayTabs to inject the below HTML object within the PayTabs payment page. This code is managed by the ACS of the issuer, which handles the 3DS2 process between the customer’s device and the issuer.
However, after injecting this code and leaving the control to the issuer’s ACSs, some of the issuers stop responding or communicating with PayTabs with any updates. Hence the customer will be kept on the payment page looping in the loading screen, waiting for the issuer side to respond, communicate, or even redirect him. PayTabs has no upper hand or control over making a non-responding issuer respond.
6- Payment final result
Once the payment is successfully processed by the acquirer bank, PayTabs will send the payment response back to your App. You can then handle the response as needed in the next step.